A stuck crankshaft thrust washer can quickly turn what should be a straightforward repair into a frustrating engine project. Whether you’re measuring excessive crankshaft end float, rebuilding a high-mileage engine, or replacing worn thrust washers as preventive maintenance, one challenge often appears unexpectedly: the old thrust washer refuses to come out.
So, how do you remove a stuck thrust washer?
In many cases, the washer can be removed without pulling the engine or removing the crankshaft entirely. However, the exact approach depends on engine design, wear patterns, and the condition of the thrust washer itself. Understanding why the washer is stuck is the first step toward removing it safely without damaging the crankshaft or bearing surfaces.
At Holdwell, we’ve seen this issue across automotive, agricultural, and industrial crank engines. Here’s what causes the crank thrust washers to seize in place and the techniques experienced mechanics use to remove them successfully.
Why crankshaft thrust washers become stuck?
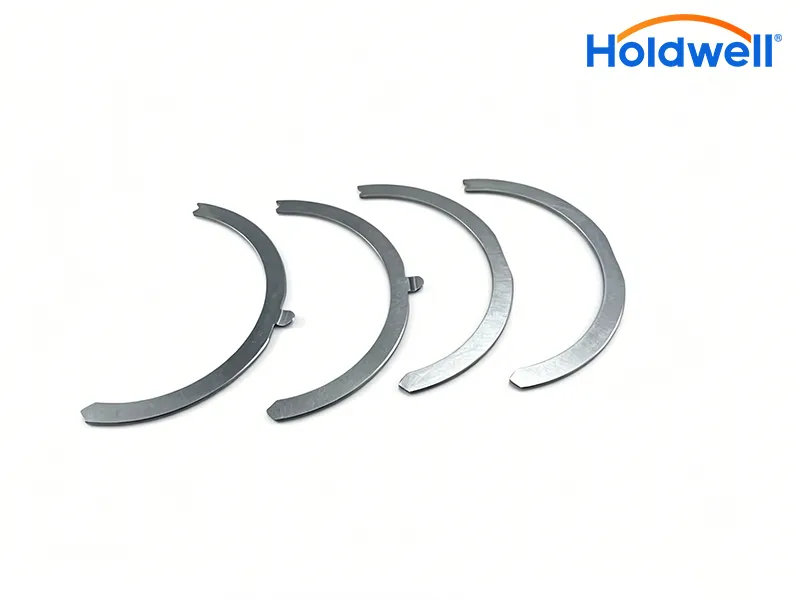
Crankshaft thrust washers control crankshaft end float by limiting forward and rearward movement of the crankshaft.
Over thousands of operating hours, several factors can make removal difficult:
-
Oil varnish buildup
-
Carbon contamination
-
Metal transfer caused by excessive wear
-
Grooving on the crankshaft thrust face
-
Distortion from overheating
-
Debris trapped behind the washer
-
Excessive clutch loading causing abnormal wear
Unlike connecting rod or main bearings, thrust washers are constantly subjected to axial loads. Every clutch engagement applies force against the crankshaft thrust surfaces. Over time, wear can create ridges that effectively lock the washer into place.
Can I replace thrust washers without pulling the engine?
The answer is often yes.
On many engines, particularly classic four-cylinder designs, the thrust washers can be accessed by removing the oil pan and center main bearing cap.
One experienced engine builder noted that on certain 1275cc engines, the inner thrust washer can often be pushed out using the replacement washer itself after removing the center main cap. This approach eliminates the need to remove the crankshaft completely.
However, before attempting replacement, always measure crankshaft end float. If end play remains within specification, replacement may not be necessary.
Excessive disassembly introduces risks that may outweigh the benefits of replacing serviceable thrust washers.
Step 1: Confirm excessive crankshaft end float
Before removing anything, verify that the thrust washers are actually worn.
Typical symptoms include:
-
Clutch pedal causing engine speed fluctuations
-
Noticeable crankshaft movement
-
Knocking noises during clutch operation
-
Transmission engagement issues
-
Abnormal bearing wear
Using a dial indicator, measure crankshaft end float and compare it to manufacturer specifications.
If measurements are acceptable, the washer may not require replacement at all.
Step 2: Relieve pressure on the thrust washer
One of the most common reasons a thrust washer feels “stuck” is that the crankshaft is loading it.
Before attempting removal:
-
Push the crankshaft fully forward
-
Then pull it fully rearward
-
Observe whether the washer loosens
Sometimes simply changing crankshaft position removes enough pressure for the washer to slide free.
A soft pry bar applied carefully at the crankshaft flange can help shift the crankshaft without causing damage.
Step 3: Remove the center main bearing cap
For engines that allow in-frame replacement:
-
Drain engine oil.
-
Remove the oil pan.
-
Locate the center main bearing cap.
-
Remove the cap carefully.
-
Inspect both visible thrust washer halves.
At this stage, many mechanics discover the washer is not actually seized but merely held by an oil film or light varnish.
If accessible, rotate the crankshaft slightly while applying gentle pressure to encourage movement.
Step 4: Use the replacement washer as a removal tool
One practical technique frequently used during engine service involves using the new thrust washer to push out the old one.
Here’s how:
-
Position the replacement washer against the exposed edge of the old washer.
-
Rotate or move the crankshaft carefully.
-
Allow the new washer to gradually displace the old washer from its groove.
This method reduces the likelihood of scratching the crankshaft thrust surface compared with metal picks or screwdrivers.
For lightly stuck washers, this is often the safest solution.
Step 5: Free a heavily stuck thrust washer
Sometimes wear has created grooves or scoring that prevent easy removal.
In these situations you need to:
Apply penetrating lubricant
A high-quality penetrating oil applied around the washer can help dissolve varnish and loosen debris.
Allow sufficient soak time before attempting removal.
Use a plastic or brass drift
Avoid hardened steel tools whenever possible.
A brass drift can be used to gently tap the washer while minimizing damage to surrounding components.
Rotate the crankshaft
Small rotational movements can help break deposits loose.
Never force the crankshaft aggressively, as doing so may damage bearing surfaces.
Inspect for wear ridges
If the washer has worn deeply into the thrust surface, removal may require carefully working around the entire circumference rather than forcing one side.
Patience is usually more effective than excessive force.

Common mistakes to avoid
Using screwdrivers as pry bars
This is one of the fastest ways to damage crankshaft thrust faces.
Even minor scratches can accelerate future wear.
Ignoring crankshaft condition
Sometimes the washer is not the real problem.
If thrust surfaces are heavily worn, simply installing new washers may not restore proper end float.
Inspect the crankshaft carefully before reassembly.
Replacing washers without measuring end float
A common misconception is that all old thrust washers should automatically be replaced.
Experienced rebuilders often find original washers still within specification, while some aftermarket “standard-size” replacements may actually require fitting to achieve correct clearance.
Always measure before and after installation.
What if the washer keeps falling out?
Certain engine families are known for thrust washer retention issues.
In severe cases, excessive crankshaft movement can allow the washer to shift from its intended position.
If you discover a displaced washer, inspect:
-
Crankshaft thrust faces
-
Main bearing saddles
-
Bearing cap alignment
-
Oiling passages
A replacement washer alone may not solve the underlying problem.
Conclusion
Removing a stuck crankshaft thrust washer is rarely about brute force. In most cases, success comes from understanding why the washer is stuck in the first place and using controlled techniques to free it without damaging precision-machined surfaces.
The good news is that many engines allow thrust washer replacement without removing the entire engine or pulling the crankshaft. By measuring end float first, relieving crankshaft load, and using proven removal techniques such as the replacement-washer method, you can often complete the job efficiently while avoiding unnecessary teardown.
At Holdwell, we always recommend inspecting the complete thrust system—not just the washer itself. Proper diagnosis helps ensure that a simple thrust washer replacement restores reliable engine performance instead of masking a larger crankshaft wear issue.